
7 Days to Die Server Settings Explained
A 7 Days to Die server reads its rules from serverconfig.xml, a long XML file in the server's main folder. On NEXUS you rarely need to open it: the Game settings page in the Game Hosting Panel has a labelled control for each option and writes the file for you. This guide explains what the settings do, gives the serverconfig.xml property behind each one, and points out the ones that cost performance.
On this page (7 sections)
Changes on Game settings apply the next time the server starts.
Difficulty, PvP and where new players start
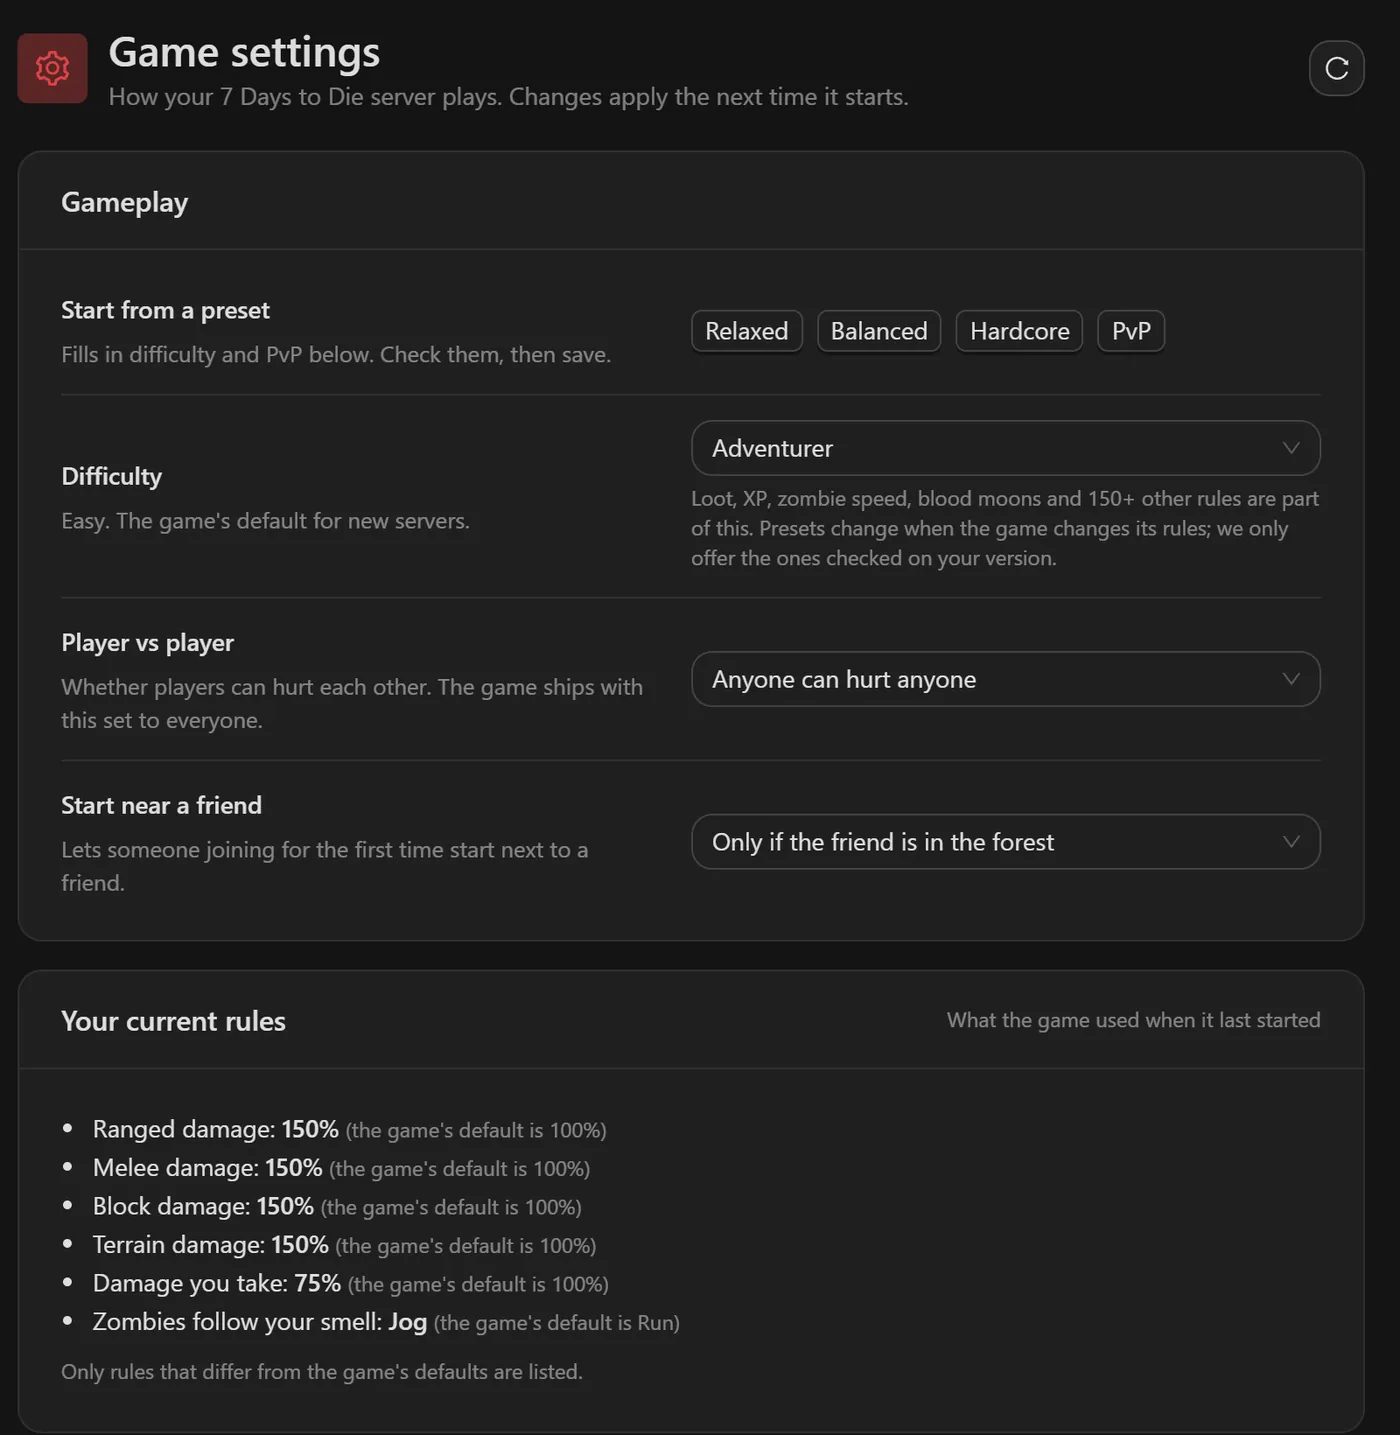
The Gameplay section starts from a preset (Relaxed, Balanced, Hardcore or PvP), which fills in difficulty and PvP. Check them, then save.
Difficulty (GameDifficulty)e.g. 1- From Scavenger (
0) and Adventurer (1, the default for new servers) up to Insane (5). On current versions the difficulty bundles far more than zombie damage: the panel notes that loot, XP, zombie speed, blood moons and more than 150 other rules are part of it. Player vs player (PlayerKillingMode)e.g. 30no killing,1allies only,2strangers only,3everyone. The game ships with3.Start near a friend (AllowSpawnNearFriend)- Lets someone joining for the first time spawn next to a friend: never, always, or only if the friend is in the forest.
Your current rules lists what the game actually used when it last started, but only the rules that differ from the game's defaults. It is the quickest way to check a preset did what you expected.
Tip: Older guides list properties such as BloodMoonFrequency, LootAbundance or XPMultiplier. 7 Days to Die has changed its settings between versions, and the panel only offers what your version supports. If a property from an old guide is not on the page or in your serverconfig.xml, your version does not use it.
Passwords, the server browser and crossplay
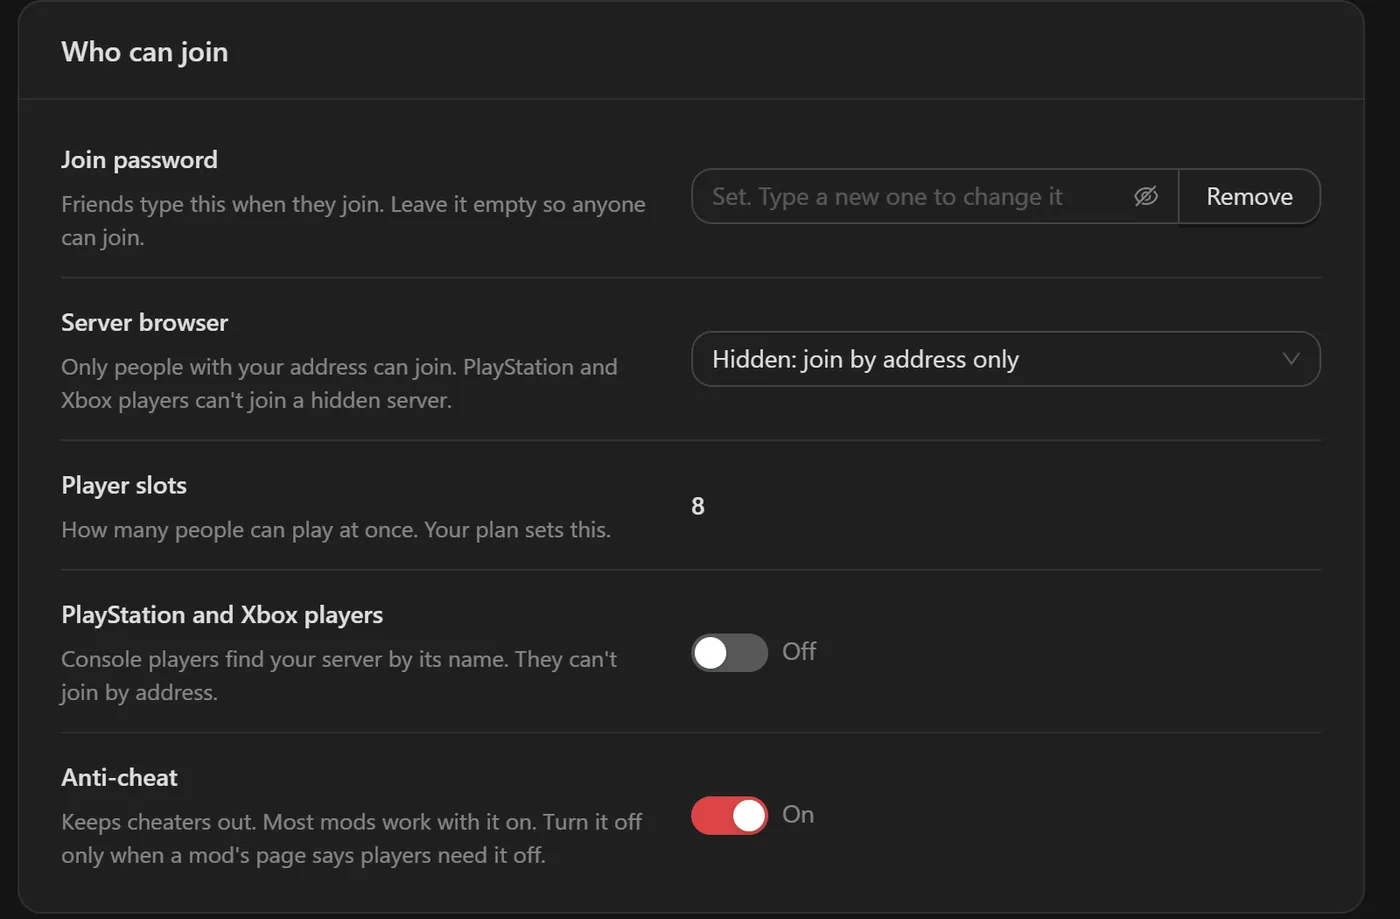
Join password (ServerPassword)- Friends type it when they join. Leave it empty so anyone can join.
Server browser (ServerVisibility)e.g. 22public,1friends only,0not listed. The panel warns that PlayStation and Xbox players cannot join a hidden server.Player slots (ServerMaxPlayerCount)- Set by your plan, so it is shown rather than edited.
PlayStation and Xbox players (ServerAllowCrossplay)- Console players find your server by its name; they cannot join by address.
Anti-cheat (EACEnabled)- Keeps cheaters out. Most mods work with it on; turn it off only when a mod's page says players need it off.
The Server list section below sets the Server name (ServerName, which console players search for), Description (ServerDescription), Website or Discord link (ServerWebsiteURL), Region and Message when joining (ServerLoginConfirmationText), which players must accept before they join.
World, land claims and zombie counts
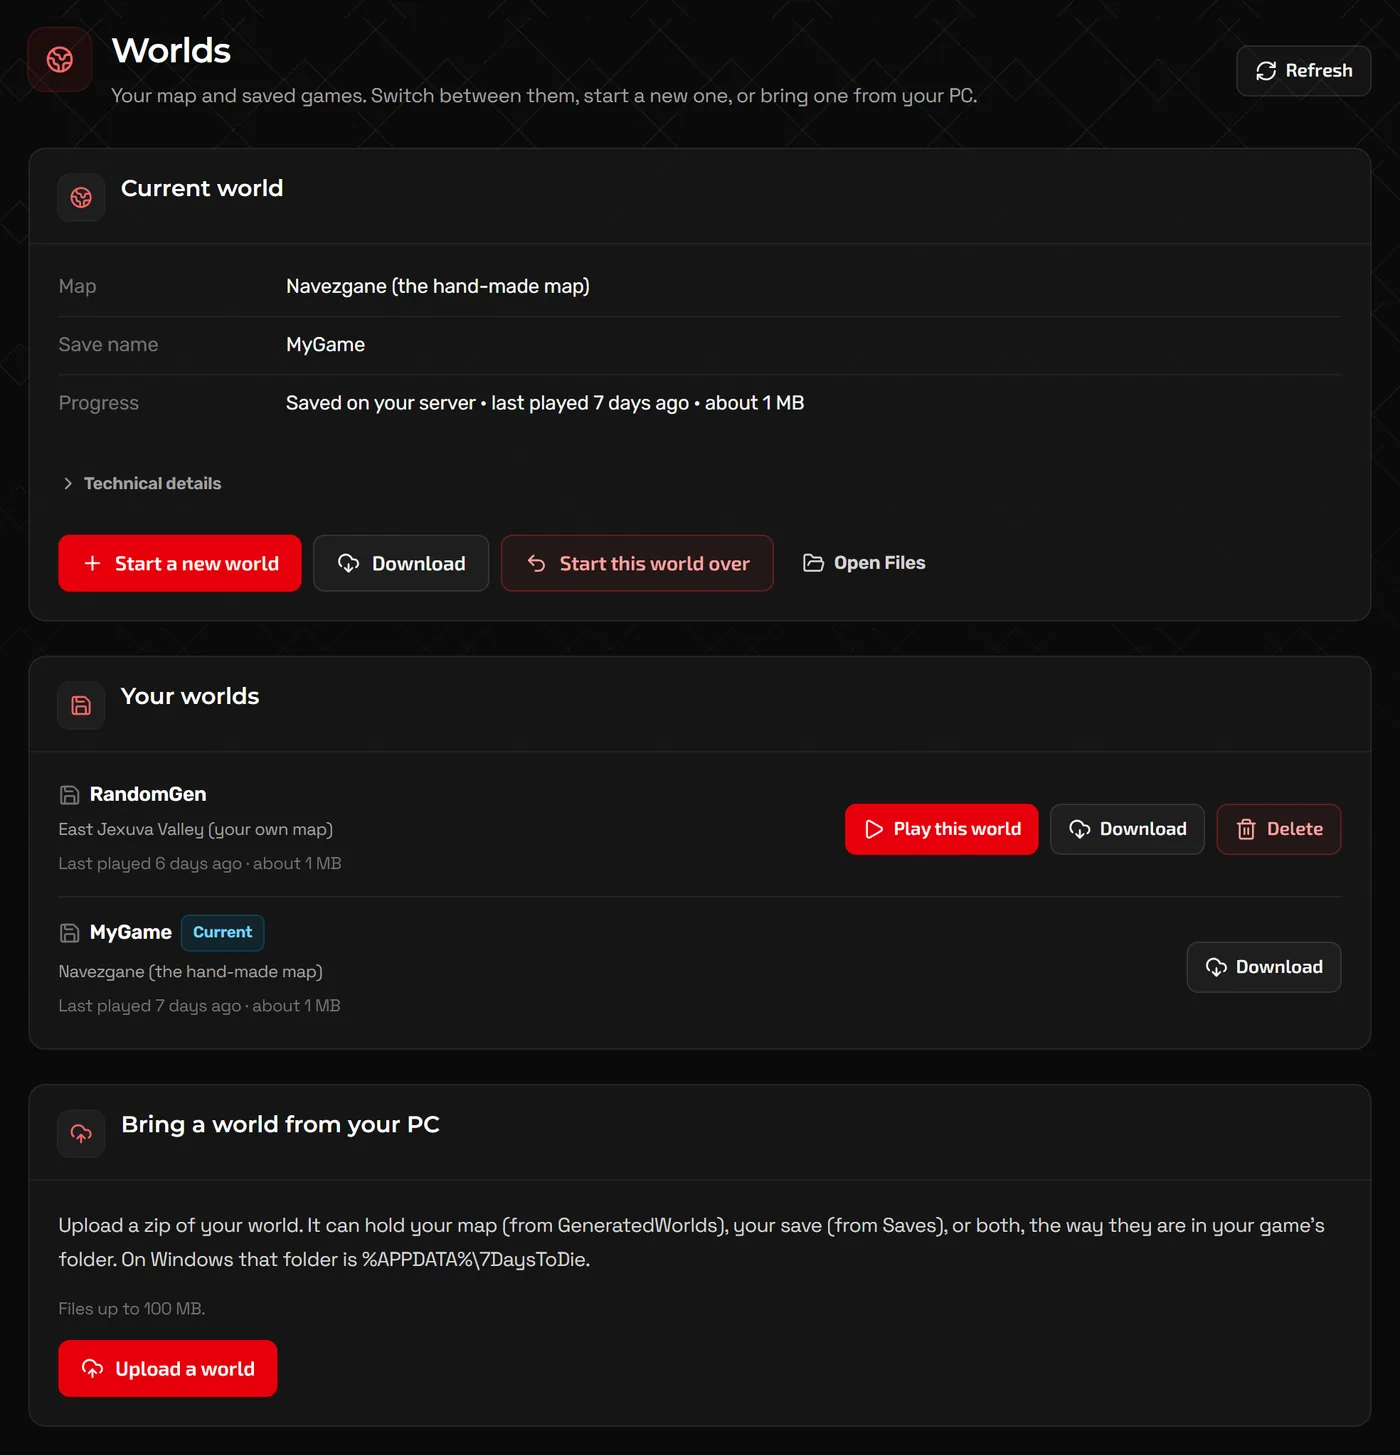
Map (GameWorld)e.g. Navezgane- Navezgane is the hand-made map; the others are randomly generated. Change it on the Worlds page.
Save name (GameName)e.g. MyGame- Your progress on that map is saved under this name. A new name starts a new save on the same map.
Land claim blocks per player (LandClaimCount)e.g. 5- How many bases each player can protect.
Base protection while away (LandClaimExpiryTime)e.g. 7- Days a claim keeps protecting after its owner was last online.
Zombies at once (MaxSpawnedZombies)e.g. 64- The most zombies alive on the whole map, blood moon hordes included. A major factor in server load.
The Worlds page shows the current map and save, lists your other worlds with Play this world and Download, and has Start a new world and Start this world over. To use a world from your PC, zip the map (from GeneratedWorlds), the save (from Saves) or both, the way they are in %APPDATA%\7DaysToDie on Windows, and use Upload a world. The page accepts files up to 100 MB.
More settings for experienced players
Open More settings at the bottom of Game settings for the rest. The ones people change most:
- Reserved slots and Admin slots (
ServerReservedSlots,ServerAdminSlots): extra slots for players with a given permission level from your admin list, where0is the highest level. - Safe start up to level and Safe start lasts (
PlayerSafeZoneLevel,PlayerSafeZoneHours): a zombie-free area around new players while they find their feet. - Bedroll safe area and Bedrolls last (
BedrollDeadZoneSize,BedrollExpiryTime). - Land claim size and Space between claims (
LandClaimSize,LandClaimDeadZone), and how strong claimed blocks are with the owner online or offline. - Creative menu for everyone (
BuildCreate): every player can spawn any item. The panel describes it as meant for testing, not normal play.
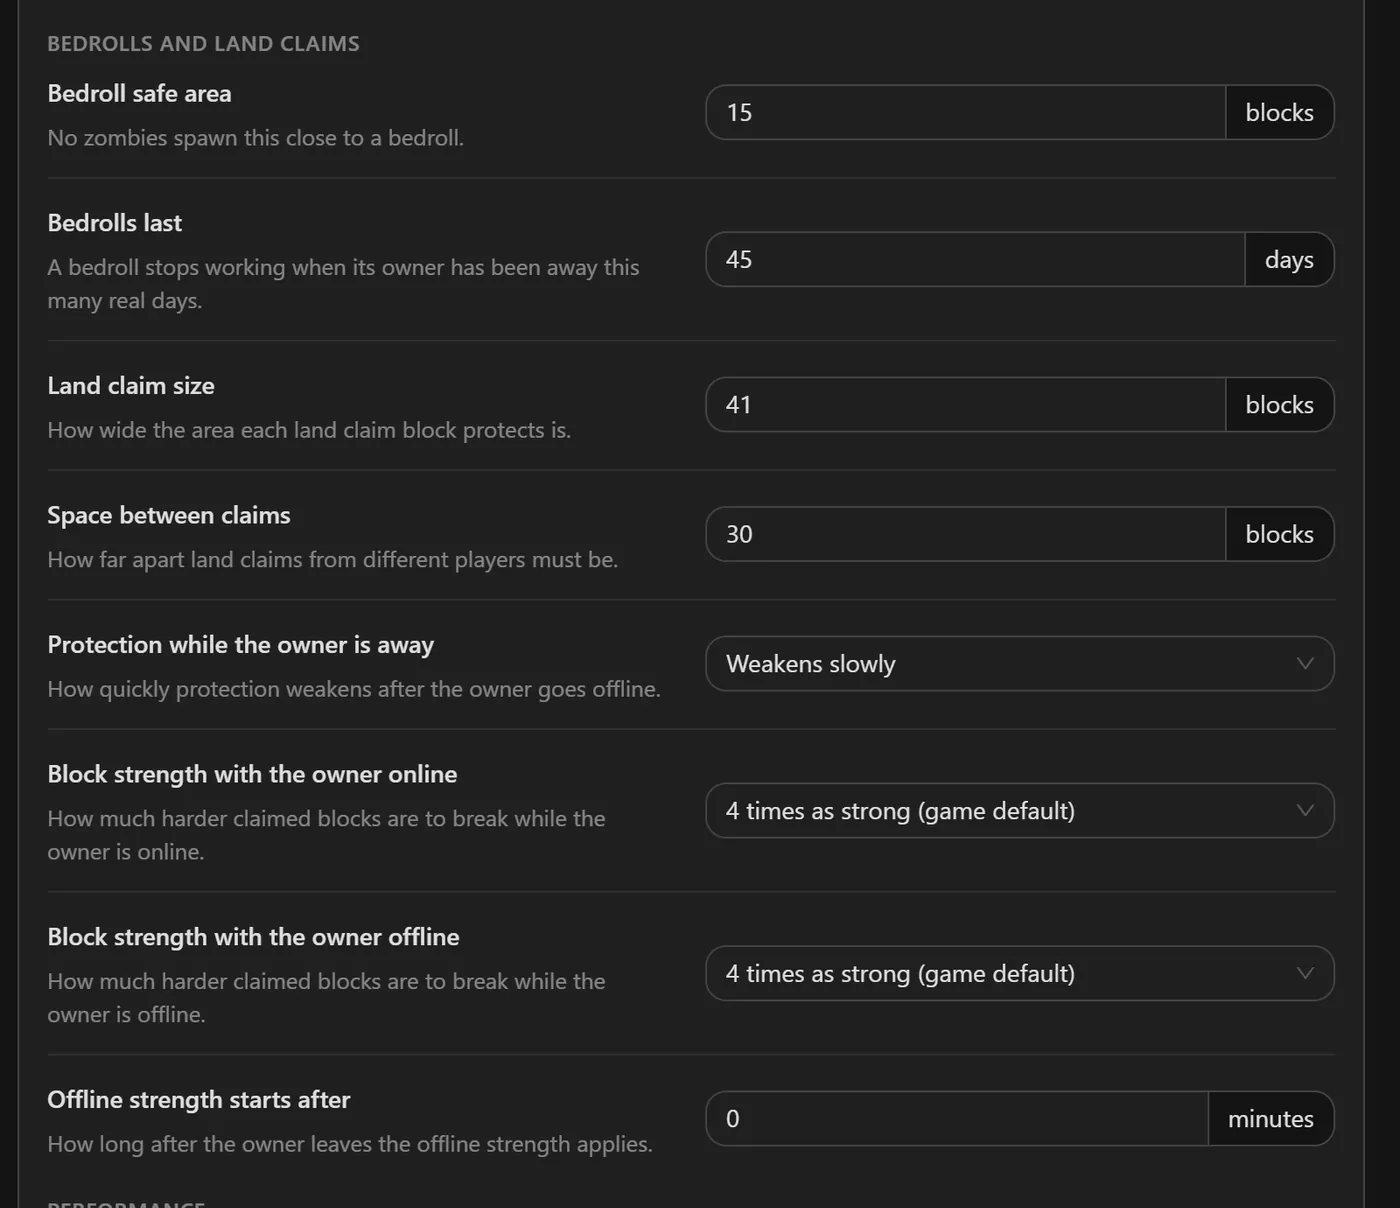
The link at the bottom of More settings opens serverconfig.xml itself in Files. Stop the server first, and keep each property on its own <property name="..." value="..."/> line.
Settings that cost performance
If the server stutters during blood moons or as the map fills with bases, these are the levers, roughly in order of impact:
- Zombies at once (
MaxSpawnedZombies) and Animals at once (MaxSpawnedAnimals). Lowering the zombie count is the most direct way to steady a busy horde night. - View distance (
ServerMaxAllowedViewDistance). The panel warns that far view distances use a lot more memory and suggests keeping it lower on smaller plans. - Distant buildings (
DynamicMeshEnabled): shows far-away player bases at the cost of memory. Limiting it to land claims, or turning it off, saves memory on big maps. - World size. Larger random maps take longer to generate and need more memory; the hand-made Navezgane is a fixed size.
Admins, whitelist and bans
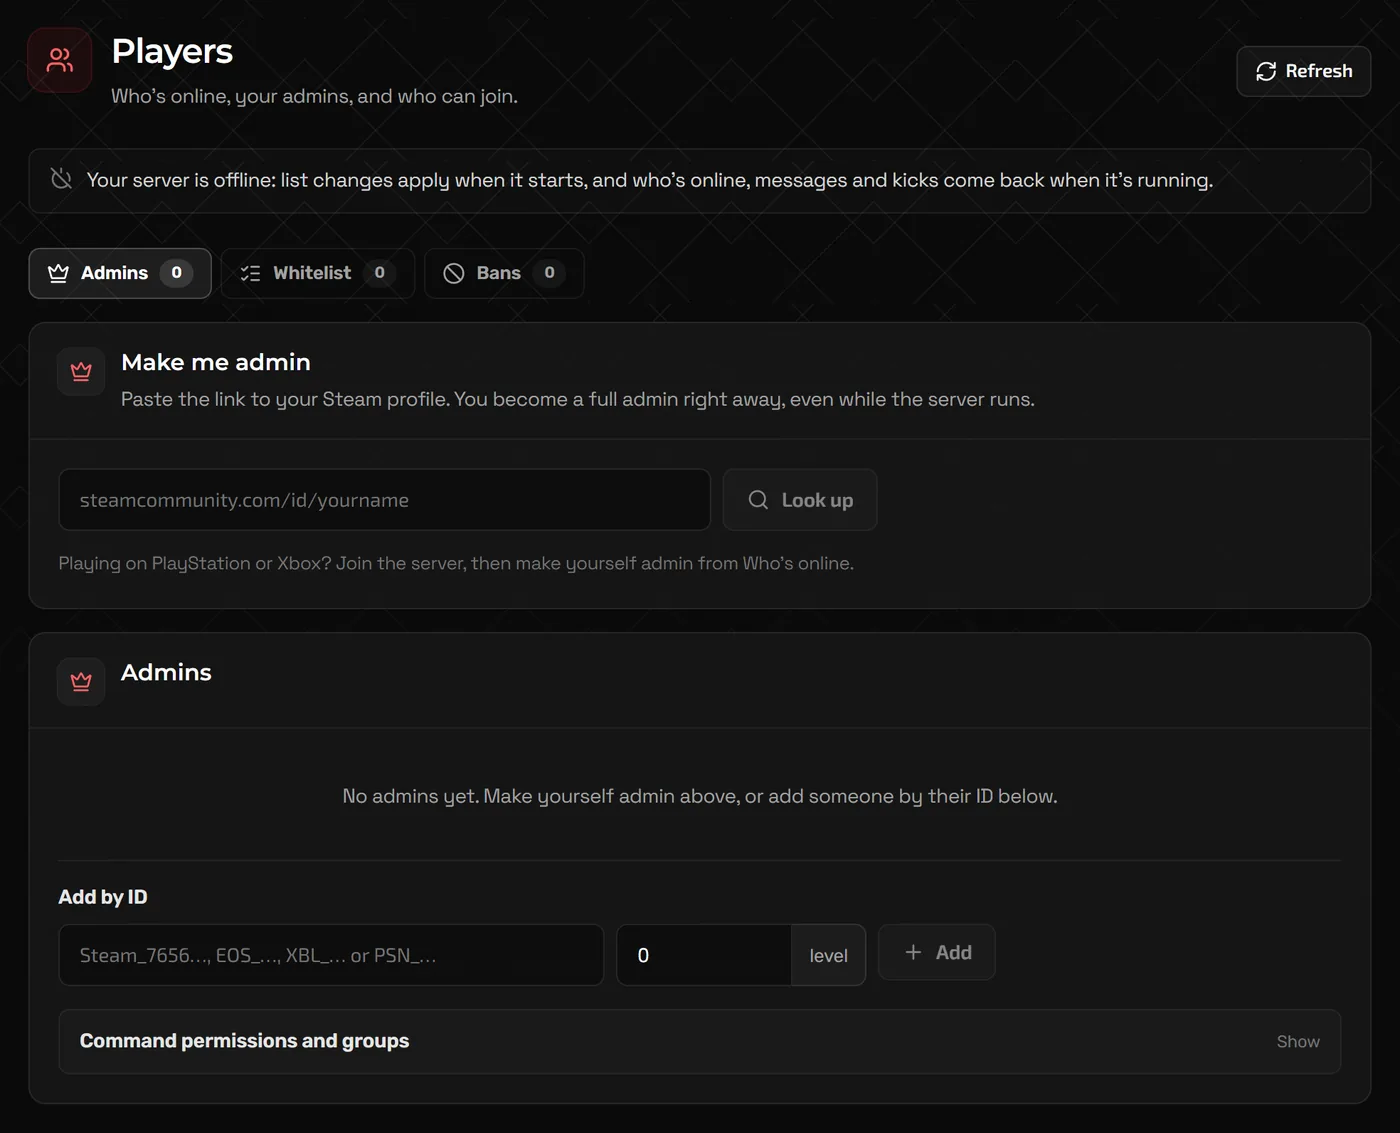
Open Players. The Admins tab starts with Make me admin: paste your Steam profile link, click Look up, then confirm with the button that names your profile. You become a full admin straight away, even while the server is running. Console players join first, then make themselves admin from Who's online.
- The Whitelist tab: adding anyone here turns the whitelist on, and then only people on it can join.
- The Bans tab: ban someone who is not online by their Steam profile.
- Talk to everyone sends a message to all players and Save the world now forces a save, both while the server is running.
FAQ
Where is serverconfig.xml?
In the server's main folder in Files, next to the server program. Use the link at the bottom of More settings on Game settings, or open it in Files. Stop the server before editing by hand.
Why did my blood moon or loot changes not apply?
Settings apply at the next start, so restart after saving. On current versions many of these rules come from the difficulty you choose; check Your current rules after a restart to see what the game used.
Can I change the game version?
Yes. The Version page offers Stable, Experimental (players must opt in on Steam too) or an older version, which helps when an overhaul mod has not caught up. Everyone who joins needs the same version.
How do I install mods?
The Mods page installs a mod from its zip file. Each mod needs its own folder inside Mods with a ModInfo.xml file, and the panel has a How to install mods link on that page.
Related guides
Project Zomboid Server Settings and Workshop Mods
The three config files, the settings worth changing, adding Workshop mods and maps correctly, and admin access levels.
ARK: Survival Ascended Server Settings (GameUserSettings.ini and Game.ini)
GameUserSettings.ini vs Game.ini, rates and difficulty, breeding multipliers, admin access and adding CurseForge mods.
How to Make a Minecraft Server to Play With Friends
Java or Bedrock, how much RAM you need, the server.properties settings that matter, ops and whitelists, and how friends connect.